Fingerprint authentication offers a convenient and secure way to access your system without having to type your password every time. If you’re running Ubuntu and want to enable fingerprint authentication for sudo operations, follow this short step-by-step guide.
Step 1: Install fingerprint tools
First, ensure that the required fingerprint tools are installed. Open a terminal and run the following commands:
$ sudo apt update$ sudo apt install fprintd libpam-fprintdStep 2: Enroll your fingerprint
Once the tools are installed, you need to enroll your fingerprint. Run the following command and follow the on-screen instructions to register your fingerprint:
$ fprintd-enrollYou will be prompted to scan your fingerprint several times until the process is complete.
Step 3: Configure PAM (Pluggable Authentication Module)
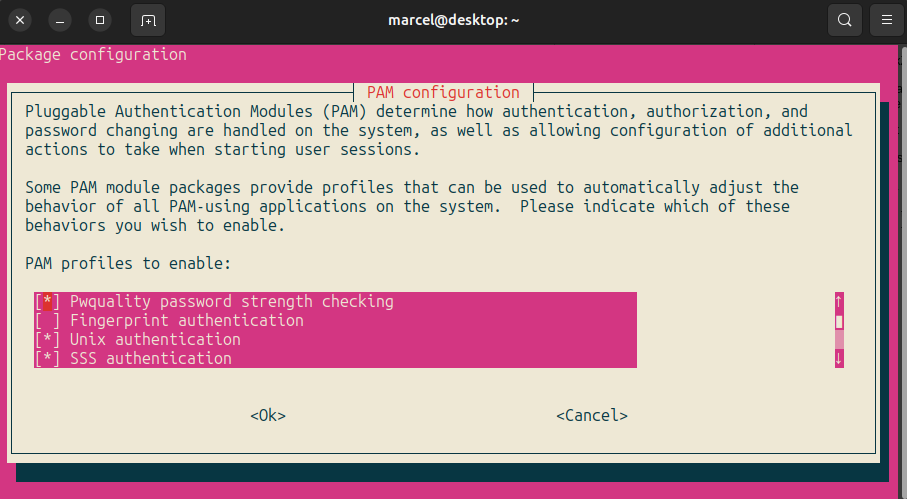
Next, we need to configure PAM to use fingerprint authentication for sudo operations. Run the following command to open the PAM Configuration dialogue.
$ pam-auth-updateNow you should see the following dialog in your terminal:

Now, select “Fingerprint authentication”, navigate to OK with Tab, and press the space bar to save the configuration.
Step 4: Test the configuration
To ensure everything is working correctly, open a new terminal session or log out and log back in. Then, try to execute a command with sudo:
$ sudo apt updateYou should be prompted to scan your fingerprint instead of entering your password. If the fingerprint authentication is successful, the command will execute as expected.
Photo by George Prentzas


Leave a Reply