Some assumptions
- You have Home Assistant running nicely on your internal network.
- You have a Synology Diskstation running.
- You have a (sub)domain pointing to your home network IP / Synology.
- You have already created a Reverse Proxy rule for Home Assistant.
Edit Reverse Proxy rule for Home Assistant
Since you already made a Reverse Proxy rule for your Home Assistant server, it is reachable from outside your internal network, but you get that error message. Here’s how to solve it.
Step 1
Open Synology DSM and navigate to Control Panel -> Login Portal -> Advanced. There click on the Reverse Proxy button. You should see your Reverse Proxy rule for Home Assistant, select it and click Edit.
Step 2
In the modal window click on Custom Header. Now click the Create button and select WebSocket.
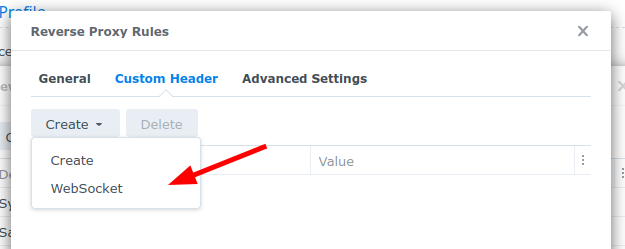
Now you should have these two headers added to the configuration:
Upgrade: $http_upgrade
Connection: $connection_upgrade

Step 3
Since we now have the Reverse Proxy configuration set up, we need to tell Home Assistant that a trusted proxy is used. Read more on this in the Home Assistant documentation.
Add the following to your configuration.yaml file:
http:
   use_x_forwarded_for: true
   trusted_proxies:
      - xxx.xxx.xxx.xxx # IP of Synology
Now restart Home Assistant, and all should be working!